Ultralight Stream Crossing Shoes

If you subscribe to Ray Jardines ultralight philosophy – you don't really need these. You should just plough ahead and do stream crossings in your hiking/tennis shoes – get them soaked – and let them dry out over the next few hours.

nylonshoes

However, If I know the trail will be mostly dry, except for a few stream crossings – I would rather take a little bit of a hit – and get across the water with dry feet. I've tried sandals, neoprene socks etc – and while not the most stylish option (be prepared to be laughed at), these nylon mesh shoes are a great balance between some sole-protection and minimal weight penalty.

Ignore the sizes. I wear a men's 10 and I can JUST fit into the large size – no way I could get into the medium.

Theresa has the small at 1.5 oz.

I have the large at 2.1 oz.

Available here at Sprint Aquatics, for a whopping $4.95.

El Camino Del Rey

This 'trail' built between Chorro and Gaitanejo Falls was built in 1905. The walkway has now gone many years without maintenance, and is in a highly deteriorated and dangerous state. It is 3 feet wide, and is 700 feet above the river. Nearly all of the path has no handrail. Some parts of the concrete walkway have completely collapsed and all that is remaining is the steel beam originally in place to hold it up and the wire that follows most the path (Wikipedia Info)

Wow. Makes me want to get my rock climbing shoes on. 🙂

The PlatyPod Ultralight Tripod

For better or worse, my DNA is full of engineer genes. This means, I'm constantly coming up with more crazy or fun ideas for new stuff than I could ever execute on. I love the MYOG (Make Your Own Gear) movement, but just don't have time to spend on it.

Here's my latest brain-fart:

playtpodI've been keeping my eye open for a while now for a true Ultralight Tripod. Would it really be possible to have a sub-pound tripod that could accompany a digital SLR in the field without feeling like I've regressed to the old way?

So far… nothing. Carbon fibre is the most promising, but they are still 2lb+ tripods. Generally the photo community says that anything lighter weight is too flimsy or unstable.

So what if one added some weight in the field to pull the center of gravity down and anchor the tri-pod in place?

Here's the idea: a tripod with a threaded pipe connector at the base. You whip out your flimsy tripod, whip out a platypus – fill it with 4lbs of water (or sand) and screw it to the bottom. Voila. Now all I need to do is find a light flimsy tripod.

Target weight: 10 oz, available sometime in the future.

Camelback Mountain, AZ

Theresa and I spent last week in Arizona. Her belly is getting bigger and she wanted a little relaxation time before our new addition arrives in August.

I've never been to Arizona before, nor spent much time in a desert (I don't think Vegas counts), so it was quite the culture shock to see all the giant cacti everywhere and feel the heat.  We stayed near Camelback Mountain and I decided to do a little day hiking while I was there to explore a little.

There are several trails on Camelback that are very short, but fun none the less.

On Saturday I decided to take the Echo Canyon trail to the summit. It's a very short 2.4 mi (round-trip) trail with about 1,200 ft of gain. I normally enjoy a little solitude when hiking – so decided to avoid the crowds and be on the trail at 5:30 am. Boy was I in for a surprise!

At 5:20 am, I arrived at the trailhead to find the car park jam packed.

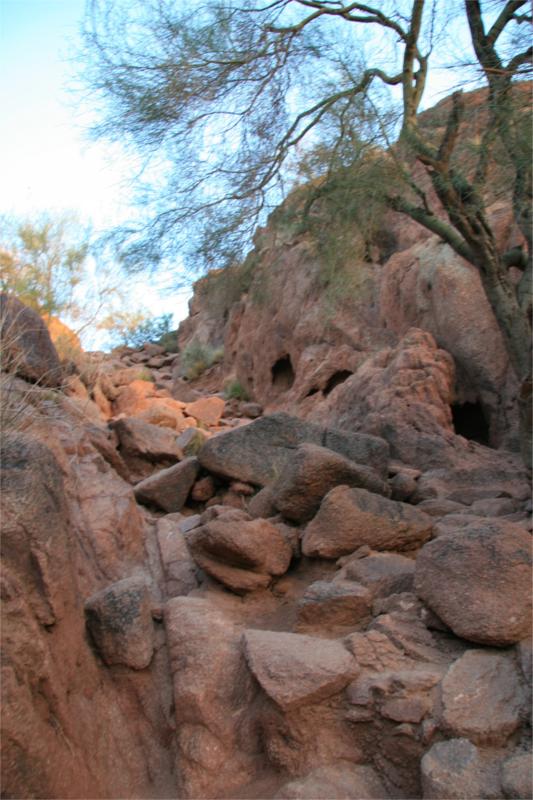
The trail starts out easy enough with large log steps leading the way on the trail. The scenery here is stunning with incredible reddish rock formations off to the side.

The beauty of the boulders made me wish I had a pair of rock boots and a chalk bag with me, and I could dwindle a few hours bouldering around.

On the way up I passed by a large 12 foot cactus that was flowering. The flowers were swarming with bees hard at work.

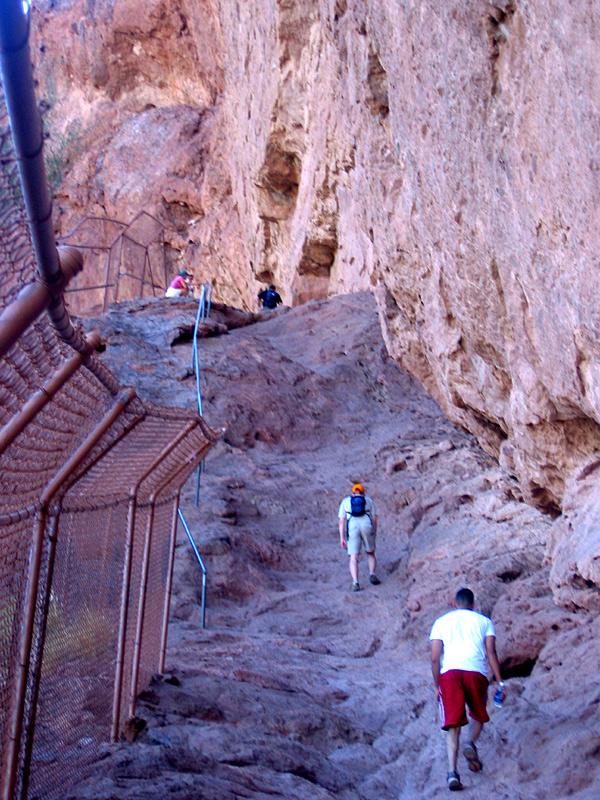
The trail climbed quickly up towards the ridge on the left. It soon leveled off and entered an area that was caged in with chain link fence. I assume to prevent people wandering off the steep side.

Immediately after the chain link was a 'hand rail' cemented into the rock to aid with the now steepening climb. The rock was passable without the handrail, but you needed to be confident of your footings.

I was amazed at both how crowded the trail was, and mused at how varied the trail goers were. I don't think I have been on a trail this crowded in the Pacific Northwest – I must have passed a different person every 50 yards or so – either coming down, or slowly moving up.

The crowd made for great people watching – there were serious hikers with Camelbaks and heavy boots, there were trail runners doing a 3-trip laps – up and down – up and down, there were tourists with cameras that looked like they had just got off a tour bus, there were hip young couples wearing blue jeans, perfume and make-up. There was a man carrying a baby on his back and countless dogs. It's 5:40am for gods sake!!! Where did all these people come from??

After the second set of rails, a few twists and turns, the trail finally starts heading up the last seep section to the summit.

The views from which, were expansive and urban. The sprawl of Arizona spread out before me – mostly flat with the occasional rock burst jutting out of the ground. 

It took me about 35 minutes to reach the top and about 20 minutes to get back down again. It's a quick hike – but highly recommended if you are in the area. I have no idea when you would go to avoid the crowds – perhaps make it a mid-day hike with a mylar umbrella and an asbestos suit?

I have a new found respect for the chapter of Beyond Backpacking about hiking in the desert that I blissfully ignored before.

I didn't take my camera – so thanks to Cobalt123, TeechNosPos, Daniel Greene and phxpma for graciously sharing their flickr photos via Creative Commons.

BackpackingLight Magazine Issue 9

(Warning: Technology rant imminent…)

I recently subscribed to BackPackingLight magazine, produced by the team at backpackinglight.com. For some reason, I must have misunderstood the offering. I assumed it was a print magazine and would come in the mail. The idea of noodling over the pages at a local coffee shop sounded quite appealing.

Last night I received an email informing me that my magazine was ready for electronic pick-up. Interesting… I've read a few e-books before – so why not – save a few branches – sounds like a fine idea.

Unfortunately, BPL Magazine uses Zinio for their distribution. Zinio is the weak link in the deal.

IMHO Zinio has fallen into the same trap as the music industry – they are seemingly so paranoid about copyright infringement that they have tried to build their own form of DRM protection. Instead of simply rendering a PDF of the magazine, they have built a custom Flash based viewer. The viewer makes reading the magazine a miserable experience.

There are many flaws with it:

  • You can only zoom in predefined steps
  • You can't drag-pan the page around without using the shift modifier
  • The custom scroll bars are flaky
  • It's really slow to render
  • The print feature only prints one page at a time

I would love to know what BPL Issue 9 contains – I just can't bear to read it in this viewer.

(OK – rant over, back to your scheduled viewing :))

Wonderland Resources at EyeHike.com

Thanks to HikingDrews's recent comment, I discovered eyehike.com. It's a treasure trove of resources – especially for the Wonderland Trail.

I haven't spent as much time as I would like on the site yet, but here are some of the things I've found so far:

Check it out – handy site.

YakTrax Traction Control

yaktrax

Our Wonderland Trail hike will probably involve a reasonable amount of snow travel given how early in the season it is and the current record snow levels.

I'm noodling on options for extra traction control. YakTrax makes a product that at approx 5 oz straps onto the base of a trail shoe for extra traction.

I'm thinking it might not be compatible with the big lug soles of my Golite Sundragons.

I'm also thinking it might be overkill to justify an extra 5 oz and poles and caution will be enough to get by with.

Interesting product though.

We’re going to Wonderland!

Longmire Ranger station called today to inform us that they were able to make one of our backup itineraries work. Score! We're going to Wonderland!

The trip is set for July and our Camp sites are as follows

  • Mowich Lake (Start, No Camp)
  • Mystic Camp
  • White River
  • Indian Bar
  • Maple Creek
  • Paradise River
  • Devils Dream
  • Klapatche Park
  • Golden Lakes
  • Out at Mowich Lake

I'm really excited about it already.

Tips from the ranger:

  • Summer->Indian will have lots of snow at that time of year.
  • VERY deep snow pack currently; may make trail conditions hard
  • a big section somewhere between "box canyon" and reflection lake is washed out – we need to walk the road for 4mi (or hitch) between trails

Mini Tissue

I discovered “Mini Tissue” the other day on a fellow backpackers blog and ordered a pack.

These things are kind of cool. We normally take a few wet-ones with us on a trip to augment our TP supply. The moisture in the wet-ones add a weight penalty that means we don’t take too many. One reader suggested drying them out prior to the trip and re-hydrating on the trail. Neat idea – but I’m too lazy.

Enter the “Mini Tissue”, these tiny compressed tissues expand when you add water into a very strong ‘shop-towel’ kind of material.

They weight about 10 tissues for 1.0 oz.

Here’s a video of me re-hydrating one in our kitchen sink.

Sea to Summit Dry Bag

bag

The West Coast Trail is notorious for it's wetness. One investment we made prior to the trip last year was a couple of dry bags. These don't show up on my gear-list as I wouldn't normally feel that they are necessary, but they sure gave great peace of mind. They delivered bone-dry down night after night – even after a few mud-pit submersions 🙂

At 0.9 oz for the Small (4L) – I ended up taking two. One to cram in my down sleeping bag and one to protect my spare clothes. Theresa needed to take the Medium (8L) at 2.3 oz to fit her bulkier bag.

Available from backcountrygear.com starting at $11.95 for the small.

A Backpackers Dream

OK… first of all I have to introduce the man behind this amazing creation.

None other than Mr. Bill Snead. I was fortunate enough to get to hike (and double-turtle) with Bill on our WCT trip last year.

Bill currently works at Microsoft and is a very talented developer. While he may blow off his creation as "no big deal", I'm blown away every time I use it and am excited to see it stable enough that he's willing to share it with others.

So what is this "creation" I speak of?

Bill took the Windows Live mapping engine and overlayed on it, USGS trail maps.

Yeah yeah, big deal… Google has been doing this for a while, right?

Bill one-upped them.

The Windows Live guys didn't just stop at building a simple GPS satellite view mapping service, they integrated with the Microsoft Flight Simulator Engine which allows you to get very detailed 3-D style views of supported terrain.

Bill's mapping data has altitude information that allows for an incredible 3-D experience when viewing hiking trails and terrain.

Remember the topo-style pictures in my recent post about Little Annapurna? This is the tool I used to take those snapshots.

It now supports both FireFox and Internet Explorer (Windows Only, no Mac), and you can check it out for yourself at:

http://www.midstation.com/topo/

Usage Hints:

– Make sure you put the map in "3D mode" and download the necessary plugins.

– Hold down the CTRL key and LEFT mouse button and move the mouse around the rotate the image.

– Use the mouse-wheel to zoom in/out.

– Hold down the SHIFT key and LEFT mouse button and move the mouse around the pan the image.

– Depending on how "Zoomed-in" you are, different scale maps will load, over the topography.

IMHO – the results are staggering. Find your favourite trail and zoom right in and follow the contours and enjoy.

Great job Bill!

Mountain Desktop 1.0

Inspired by a recent post by Sarah on the new High-Def Mt. St. Helens web camera,

I jimmied up a little windows application that downloads the camera feed image every half hour and sets your desktop background.

Announcing "Mountain Desktop 1.0".

I will say, after running it for a week where you could actually see the mountain (it's pretty socked in these days), it kind of made me happy.

Hour by hour, I got to see shifts in the clouds, and watch the sunset over St. Helens, and what I was watching on my desktop was consistent with the weather outside my window in downtown Seattle.

It's a pretty simple application right now, but if anyone other than me ends up using it I'm happy to add support for more camera feed etc. Although it really works best with high-def images.

Download Mountain Desktop here.

You need the .NET 2.0 Runtime installed in order to run it.

Wonderland Permits Due

Trail permitting begins on March 15th (Tomorrow) for the Wonderland Trail. We have an application ready to go in the mail.

wtmap

The Wonderland Trail is an epic 94 mi hike around Mt. Rainier. Aside from the distance, there's quite a lot of elevation gain.

Some resources:

We applied to take on the trail in mid July. Hopefully, we have a warm spring and a lot of the snow melts.

The adventurers on this trip will be myself, Bill & Tim (from our WCT Trip) and Nigel. Nigel is taking Theresa's spot as she is pregnant and due in August, so won't be able to make it.

We going to take a somewhat relaxed pace and do the trail over nine days. There are two points at which we can cache food for re-supply, so with only having to carry three days of food on each leg, we should be able to go pretty darn light.

Caldera Cone Stove System

stove I've been considering the plunge into alcohol stoves for a few years now. My brother made me a pepsi can stove a few years back. I haven't quite struck up the courage to rely on it yet.

Several people have recently mentioned to me how impressed they are with the Caldera Cone ™ System.

OK.. I'll bite, so what would it take to make me switch?

First lets review my current gear list. My current cooking system comprises of 3 components:

The windshield is the biggest offender, and I often tell myself to leave it home, but I rarely do.

As I already have a BPL 550 pot, they make a cone custom to for this pot – which seems like the way to go.

The cone & stove weigh just 1.7 oz. Given that the cone is a natural windshield this saves me a whopping 4 oz! I suspect I could get more mileage on a 7 oz bottle of alcohol than I could in the 7 oz fuel canister.

For just $30, this might be an experiment I'm willing to tinker with.

Photon Freedom Micro LED Light

Photon-Freedom-Micro

Oh yes… the gratuitous upgrade I made prior to the West Coast Trail trip last year.

I traded in our Black Diamond LED Headlamps for these little suckers.

Total weight savings? The old headlamps weight an outrageous 1.1 oz, and these are only 0.2 oz. A whopping 0.9oz gain!

OK… I agree I'm getting into diminishing returns on my gear list and would be better served eliminating the Tarptent for a sheet of Tyvek. 🙂

So why the upgrade? Aside from just being a gear-head, there were are few other justifications:

1. Not just a simple on|off flash light – this thing is tricked out! It has a brightness control and you can dim it very low to conserve power. It has various 'blinking' modes – like an emergency SOS signal. All of this configuration with just a single button.

2. It runs for 120 hrs on a single battery.

3. The spare batteries are lighter.

4. With a little tab of Velcro on the back, it attaches easily to the rim on a hat to make a decent hands-free head-lamp mode.

5. It's bomb-proof and waterproof.

Finally… if you think about getting this – a word of caution. The light ships in a 'safety' mode to prevent accidental battery drain. If you turn it on, it auto-shuts off after 5 seconds. To get it out of this mode you have to hold the button down for a whopping 20 seconds. I learned this the hard way on the WCT. Three engineers around a campfire failed to figure this out in four nights on the trail. You wouldn't think that a single button can have so many permutations! Moral of the story: RTFM.

Available from PhotonLight.com for $19.95.

Little Annapurna Day hike

Trail Name: Little Annapurna

Distance: 15 miles, round trip

Elevation Gain: 5,200 ft

High Point: 8,440 ft

Trip Date: Aug 12th, 2007

Permits: Very restrictive over-night permits. A few are available by on-the-day lottery. See here for permit info. Day-use only permit available at trailhead.

Getting There: From Seattle – take Highway 2 east to Leavenworth. As you enter the town – turn right on Icicle Road. At 8.5 miles, turn left onto FR 7601 and follow it 3.7 bumpy miles to the Stuart Lake trailhead parking lot.

Read on for full trip report…

Continue reading

Enchantments Permits Due

The "Enchantments" are a breath-taking, endless sequence of lakes nr. Leavenworth, WA.

The area has a very strict permitting policy and only a few lucky people get a permit for overnight stays each year.

This picture was taken on our last trip there in 2004. If you are running Windows Vista – it's pretty much taken from the same spot the default Vista desktop background is taken from.

If you've ever wanted to hike the enchantments and are thinking this would be the year to do it – the applications are due soon.

You cannot mail your application prior to Feb 21st (postmark) – but it has to be there before March 1st. Then at random, they will select applicants for a permit. There are several strategies around filling out the form to improve your chances.

Some good tips and more information can be found here:

http://www.fs.fed.us/r6/wenatchee/passes/enchantments/

Ultralight Playing Cards

cards

If you backpack in groups of 4 or more, it's sometimes fun to play a game of cards at night in camp. Hearts? Spades? The options are endless…

These cards are tiny and weigh in at 0.53oz.

So go on and splurge on your next trip and treat yourself to that extra half ounce!

You can get a 3-pack from the Backpacking Light Store for $2.99.

Theresa keeps a pack in her purse also. We've occasionally pulled them out on the Washington State Ferries to alleviate the boredom on rainy days. �